Monthly Archives: March 2013

Building Walls and Laying Floors

Posted on

Spring has sprung, except no one told the weather. Since our beautiful day two weekends ago, the weather has been getting colder instead of warmer.  Just yesterday, we even had the biggest amount of snow fall this year!  With the weather being uncooperative, we took a break from working in the front yard and moved our focus back to the bathroom.

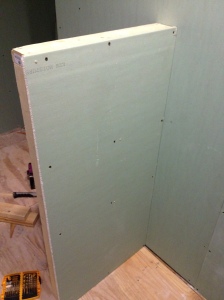
Part of the plan for our new shower is to have glass doors instead of a shower curtain.  We wanted to build a half wall to close off the shower and also allow for a place for the glass door to be connected to. We measured out how long the wall should be and Jim cut out the wood.  He nailed together the frame of the wall and then we screwed it into place, drilling a hole for the water supply line to come through.  We have a pipe coming through this wall since we plan to put the toilet up against the wall and it needs access to water.  We put up one side of drywall on the wall.

Jim nailing together the frame

Jim nailing together the frame

The wall in place with one side of drywall up!

The wall in place with one side of drywall up!

The view from the other side (standing "in the shower")

The view from the other side (standing “in the shower”)

The next day, before we added the rest of drywall, we had to do a little plumbing.  The water supply line need to have a 90 degree turn so that it came out of the wall.  Luckily, with all the practice we have had so far, Jim added the turn in the pipe without much trouble.  I continued to cut the pieces of drywall while Jim worked on the pipes.  We also wanted to make sure the wall was sturdy even at its point further away from its base, so Jim added a cross beam in the frame.  With the extra beam and drywall support, the wall turned out to be very sturdy.  The last step was to add the rest of the drywall.

Cross beam in place

Cross beam in place

New turn in the pipe - perfect and ready to go!

New turn in the pipe – perfect and ready to go!

Drywall up!

Drywall up!

Wall complete

Wall complete

We started this weekend with a trip to the tile store.  We used the same store for our kitchen floor tile and backsplash   We really liked them and their selection of tile, so it was a no-brainer for us to go there to find our bathroom tile.  We needed tile for the floor and shower. We weren’t sure if everything would be the same tile or different.  We ended up being at the store for over 2 hours (mind you, this is a small store, not a big warehouse), there were just so many decisions to make.  We got tile that we are both very excited about and it should be here in 5-7 business days. Phew.

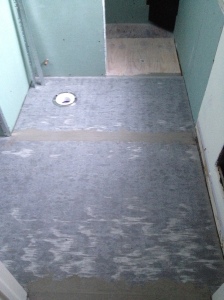
Sunday started off with us focusing on the floor.  We needed to put cement board over the subfloor so it would be ready for the tile when it arrived. We did not plan to put cement board in the shower area because we bought a base that is meant to be tiled over. That area of the bathroom will need to be water proofed and down differently than anything we have done before. Luckily, placing down cement board is old news for us.  We cut out the pieces and laid them down.  We had to cut out a hole for the waste pipe for the toilet. I measured where the hole should be on the cement board and got to work cutting it out.  When I put the cement board back in place, I saw that I measure to the wrong section in one area and the hole was about 2 inches off.  I was able to fix my error, so it was no big deal in the end.  That is why you measure twice and cut once people!  Jim prepared mortar for us to put down to keep the cement board in place.  Once he spread out the mortar, we put down the cement boards and screwed them in.  We also needed to put mortar in between the joints of the cement board and put this special tape over it.  Once it dried, there was one more layer of mortar, then the floors were  all done!

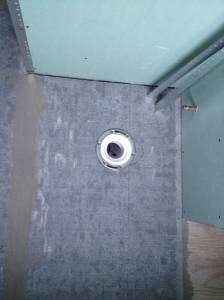
Since the cement board was down, we could now add the toilet flange.  A toilet flange is needed in order to screw a toilet into place. At first, we had a flange that would not fit well as is.  It was too long and therefore would not rest flat with the floor. Jim was able to find a different toilet flange that fit perfectly. It needed to be attached with the primer and glue like the other PVC pipes and then screwed into the subfloor, after that, it was all ready to go!

Jim spreading out the mortar

Jim spreading out the mortar

Cement board in place

Cement board in place

Cement board in place 2

Cement board in place 2

Close-up of the toilet flange

Close-up of the toilet flange

The last thing we needed to do was cut out part of the corner of the shower for our “shaving step.”  This is a little step in the shower that is designed to make shaving your legs in the shower easier (how awesome is that ladies?).  We forgot to put it into place before we put up the drywall originally so we would have to cut out part of the drywall. We had to put the shower base down so we knew the exact height of the step.  I cut out the drywall but realized there was not a good place for us to screw the step into place, so I let Jim take over.  He opened the hole in the wall a little bit more and added some 2 by 4’s behind the wall so we could screw in the step.  Due to a slope in one of the walls (something we dealt with when putting up the drywall that I forgot to mention), it created a very frustrating situation in adding the step. It needed to be level with the wall with a little slope on the top so water would not pool on the step. Jim tried many times to get it perfect.  In the end, he got it as close as he could. We plan to even it out with mortar when we put up the tiles.

IMG_0971

Shower step!

Today, we have a drywall guy at the house.  He is flattening our textured ceiling. Since we already are hiring him for that, we also told him to connect the drywall joints for us as well.  It is a longer (and therefore more expensive) job than if he just did the ceiling, but it will ensure flat and even walls throughout the bathroom.  This is really becoming a room!

One last shot of the texture ceilling

One last shot of the texture ceiling

The room before the drywall guy came

The room before the drywall guy came

The FLAT ceiling after the drywall guy was done!

The FLAT ceiling after the drywall guy was done!

Finished walls!

Finished walls!

Front Yard Facelift

Posted on

As March quickly passes by (is it seriously already the 20th?), Jim and I knew that we needed to take a detour from our master bathroom remodel to focus on some yard work. You may remember some posts about smaller projects we have done over the past year to try to increase our house’s “curb appeal,” but we still have a long way to go. The last update about the front yard involved ripping up some of the ugly bushes in the front of our home in order to prepare it for future, nicer shrubbery.  Well, it is now about the right time to start adding that shrubbery since late Winter, early Spring is one of the best times to plant.  Also, working outside in the summer time in VA is horrible.

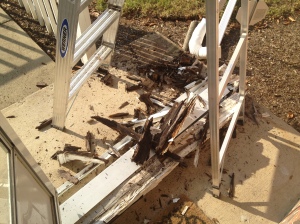
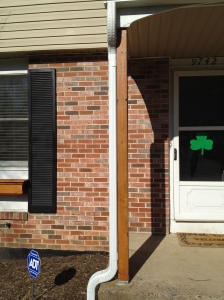
Before I get into the new project we started, there is another project Jim completed back in the Fall that I never wrote a post about. It took only a few days and Jim did all of it by himself which is why I forgot to mention it earlier.  We have a little front stoop that has part of the roof covering it. Part of the support of this roof is a large beam that goes from the stoop to the roof.  Throughout the summer, we noticed what bad shape this beam was it. I knocked into it sweeping once and all of the molding around the bottom of it crumbled away.  The beam was surrounded with a white plastic cover but it was clear that underneath it was rotted wood.  Jim was concerned that if we received heavy snowfall, the beam would provide no support and the roof over the stoop would cave in so we needed to replace it.  After Jim took off the covering, he was able to see how bad the rotting really was. He was able to put his fist through the wood beam and it just fell apart.  The roof currently had no real support.  Jim bought a strong metal base to screw into the stoop and a large, wooden beam to replace the old one.  He struggled a little bit screwing in the metal base, but eventually got it.  He also decided to stain the wooden beam the same color as the mailbox and the planter boxes we added in front of the house.  After some finagling, Jim was able to get the new beam up and in place.  It looks great now and we know it can support the weight of the roof.

The old beam - look how rotted away it is!

The old beam – look how rotted away it is! (I don’t have any good pictures of the old beam before Jim took it down, so this will have to do)

No more beam - the roof just hanging out by itself

No more beam – the roof just hanging out by itself

The metal base

The metal base

Full view of the new beam!

Full view of the new beam!

View of the new beam from the house

View of the new beam from the house

Now back to the current project…

Our good friend, Kate, has a family owned and run nursery in Ashland, VA (right outside of Richmond). When we were trying to figure out what type of shrubbery we would want in the front of the house, we contacted Kate for help.  She went above and beyond what we could have asked for!  She had us describe what we were looking for, send her measurements and pictures, and she did the rest.  She put together this amazing drawing of what we could do for the front yard, along with suggestions of what size shrubbery to start with.  She was so incredibly helpful and knowledgeable!  If you live in the Richmond area – go check out Colesville Nursery (www.colesvillenursery.com) if you ever need any sort of plants or planting advice.  You will find really helpful,  informed people, and wonderful plant options too!

I wanted to upload the drawing but I’m having issues with it – so just imagine an accurate and awesome drawing with lots of well placed shrubbery.

Here is a picture of what the front of the house looked like before we started working:

View of the house (most of it)

View of the house (most of it)

Front view of the current "plant bed" (no plants there)

Front view of the current “plant bed” (no plants there)

A little close up of the plant bed

A little close up of the plant bed

View of the side of the house (some old, ugly shrubbery is still there, but that is going to go)

View of the side of the house (some old, ugly shrubbery is still there, but that is going to go)

As you can see in those pictures, our front yard slopes downward from the front door to the side of the house.  This would make for a very uneven plant bed if we chose to keep it this way.  Instead, we decided we would build a retaining wall to keep in extra earth so we can make the plant bed even.  Turns out, building retaining walls are a lot of work.

Before we could start working on the retaining wall, we needed to get rid of the white fence in front of the front stoop. Jim always hated it when I didn’t care either way about it. Once we added the new beam with the stained color though, it looked out-of-place and I was ready to get rid of it.  With a few (hard) swings of the sledge-hammer, Jim got most of the fence up.  We had to dig deep to get the posts of the fences out, but before we knew it – the fence was gone!

The fence, right before we tore it down

The fence, right before we tore it down

Another view

Another view

Bye bye fence!

Bye bye fence!

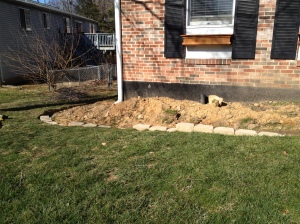
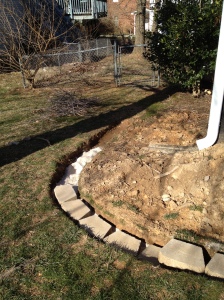
Once the fence was down, we had to measure out the flower bed.  We decided to measure out 6 ft to give our future bushes room to grow.  We also used a hose to help outline the area.  We used shovel to dig out the outline so the bed would be clear to us.  Next, we had to figure out how tall the retaining wall would be.  Since the land is sloped down, the wall will be taller in the areas where the land is lower.  We used stakes (and sticks once the stakes became too short),  string, and string levels to get an idea of how tall the wall would be.  The height of the wall determined how low we had to dig the trench for the wall.  Shorter parts of the wall (1-3 stones), only require a trench that covers part of the bottom stone.  You also need to put down a sand base in the trench that for shorter walls only need to be about 1 inch deep.  The stones are 4 inches tall, so for the shorter parts of the wall, the trench didn’t have to be deeper than 4 inches.  For taller parts of the wall (4 or more stones), we would need 4 inches of sand for the base AND the first stone needs to be completely covered by earth, which means the trench needs to be at least 8 inches deep.  Due to the sloping nature of the wall, some parts needed to be even deeper to accommodate the different levels.  Once everything was all measured, we started digging.  It was NOT fun.  Luckily, it was a beautiful day outside (yes, we actually had a few “Spring-like” days in March).  It would have taken us quicker to finish the trench, if it were not for roots from a tree near the front of the house.  This trees roots were covering the area our retaining wall needed to go.  It took a lot of effort to cut into the roots and keep digging.  After many hours of exhausting work, we got the majority of the trench done.  There was about 2 ft more on the side of the house we needed to do, but we hadn’t decided about the side of the house just yet, so we held off.  We were exhausted and called it a night.

You can see the dug up grass as the outline of the bed

You can see the dug up grass as the outline of the bed

Outline

Outline

The trench!

The trench!

Look at how defined and deep that is

Look at how defined and deep that is

Another view

Another view

The rest of the week, we worked when the weather was nice.  One night, I had a birthday dinner to attend and Jim decided to work while I was out.  He was adding the sand to the trench and leveling each stone.  The stones needed to be level front to back and side to side. They also had to be level with each other.  Needless to say, this was very difficult and time-consuming.  When I came home from dinner at 9pm, Jim was in front of the house, with a flashlight, in freezing weather, still working. I could not believe it.  He had finished almost the entire first row.  He is just amazing.

First row of stones, you can see the sand underneath them

First row of stones, you can see the sand underneath them

View from the side -you can't really see the beginning of the deeper part of the wall

View from the side – you can’t really see the beginning of the deeper part of the wall

Close-up of the deeper sections

Close-up of the deeper sections

The next opportunity we really had to work on the wall was last Friday.  I had a (staff) basketball game that night (it’s ok if you are laughing thinking about me playing basketball right now), so I could only help until 6 pm.  Since the first layer was down, it was much easier to add the additional layers.  The first layer is level, so the stones on top will continue to be level.  I piled the stones while Jim finished the last bit of the first row.  We also decided to add a cap stone to the wall, so I ran to Home Depot to get the rest of the capstones.  Jim continued to work a little bit past me that night and when he finished, he came to watch me embarrass myself….I mean play the game.  The weather took a turn for the worse this week and we have not done much since.  We still have all of our planting left to do!

View of the wall!

View of the wall!

Another view - seeing the corner

Another view – seeing the corner

We aren't sure if we are definitely leaving the end like this, but it is the working model right now

We aren’t sure if we are definitely leaving the end like this, but it is the working model right now

View from the top - the capstones!

View from the top – the capstones!

Inspection Impossible

Posted on

I have been seriously slacking on updating the blog in the past two weeks.  My ending sentiment on my previous post was a hopeful send off of passing our inspection Monday morning.  Well, things didn’t go quite as planned.

The inspector approved all the electrical, plumbing work, and water supply, but had a question about the shower panel we planned to install.  He claimed that if the panel did not have the performance standard ASSE 1016 stamped on it, then we would have to install a mixing valve with the supply pipes.  The point of the mixing valve and the ASSE 1016 is that it prevents the hot water from scalding someone when taking a shower. Jim and the inspector searched our shower panel and could not find the ASSE 1016 stamp. It was clear there was a stopping mechanism so the shower could not get too hot and the manual stated the maximum temperature to be 100 degree Fahrenheit, but that was not enough for the inspector.  He failed us based on the shower panel (not ANY of the work we did).  He told Jim that we could install the floor and put up drywall in other areas of the bathroom though, since all of the work we did was in compliance.

So Monday night, Jim installed the subfloor while I started to measure and cut out pieces of drywall.  Jim also added two by floors in between some wall joists so we would be able to hang up the shower panel when it did get approved (we were determined to come out on top in this situation). Tuesday, we did a little bit more drywall installation. Wednesday, we both had the day off due to the “snow-quester” storm.  We only received about 2-3 inches of snow, but finished installing a lot of the drywall.

Our failed inspection turned into a much bigger deal than we had hoped. After calling the company who makes the shower panel, Jim found out it did not have the ASSE 1016 certification, but it did in fact prevent hot water from getting pass 100 degrees Fahrenheit, which is what the inspector needed to know.  Jim started looking into adding a mixing valve with the supply pipes in case we really needed them without the ASSE 1016 certification.  The first time the inspector came out, he had told Jim that he could take some pictures of the shower panel and ask around to other inspectors what they thought of the stopping valve and if that was ok. Jim therefore prepared the shower panel to show it could not get hotter than 100 degrees Fahrenheit (he took off the knob to show the stopping mechanism). We scheduled another inspection for Wednesday, which was cancelled due to snow, and then rescheduled for Thursday morning.  I had a delayed opening for work, so I had the opportunity to meet with the Inspector while Jim went to work.

My goal was to kill him with kindness so he wouldn’t want to fail us. I tried to charm him, but shortly after his arrival, I realized that was not happening.  He came and continued to look for the ASSE 1016 label again. He mind was single-tracked and it was as if he had never told Jim that he could ask around for other people’s opinions on if it would be ok. He told me there was no way he could pass us with a shower panel without the label. I asked about the mixing valve he previously mentioned and then he told me he was wrong about that and we could not even add a mixing valve behind the wall because that was against code. That meant it was the ASSE 1016 or bust. Apparently, NO ONE in Fairfax County VA could have this specific shower panel in their bathroom. Nothing was good enough for this guy.  Then, while looking at the shower panel, he noticed the 6 small body sprayers on the shower panel. He stated he hadn’t noticed those before and any shower with 3 or more shower heads needed a 3 inch shower drain.  We had installed a 2 inch shower drain.  Now he was going to fail us because of that.

Please keep in mind, that Monday he had told Jim that we could install the floor and drywall in most areas of the bathroom because nothing was wrong with our work.  As I stated, we already did this work prior to the inspector coming out. This is all that we did:

The new subfloor in place with two hole cut out for waste drains!

The new subfloor in place with two hole cut out for waste drains!

Jim added two by fours so when we need to hang up the shower panel, we will have something to screw into

Jim added two by fours so when we need to hang up the shower panel, we will have something to screw into

One wall in place! (The drywall is blue because it is a special "mold resistant" drywall)

One wall in place! (The drywall is blue because it is a special “mold resistant” drywall)

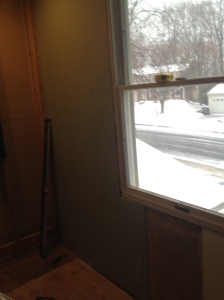
Wall number 2 (the brightness of the snow is messing up this picture)

Wall number 2 (the brightness of the snow is messing up this picture)

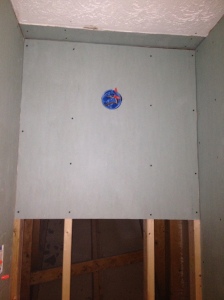
The top view of wall number 2

The top view of wall number 2

The extension of wall number two

The extension of wall number two

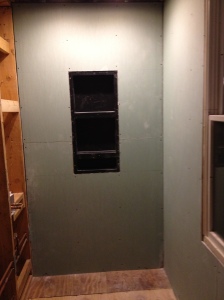
Wall number 3 with tile-ready shower shelves! Nothing to bang your head on in this shower!

Wall number 3 with tile-ready shower shelves! Nothing to bang your head on in this shower!

Wall number 4

Wall number 4

Little fix in the ceiling where there wasn't drywall before.

Little fix in the ceiling where there wasn’t drywall before.

Wall number 5 - the area above the sink

Wall number 5 – the area above the sink

Wall number 5 continued

Wall number 5 continued

The bottom of wall number 5...I know it doesn't look finished but since it will be behind the vanity, it does not matter that there are openings

The bottom of wall number 5…I know it doesn’t look finished but since it will be behind the vanity, it does not matter that there are openings

Now he is trying to tell us that if we were able to get this shower panel approved, we would have to rip up the floor and redo all of our plumbing pipes so we could have a 3 inch drain for our multiple shower heads. It did not matter to him that the same two supply lines were all that was going to be providing the water. Without adding MORE supply lines, the shower panel would be limited to how much water could come out of it. He stated that in the future, someone could install a water booster and more water would come out and the shower would overflow (of course if someone did this in the future, THEY would have to get a permit and inspection and he could fail them then, but that didn’t seem to matter to him).  I got his supervisor’s information and updated Jim about the inspection.  To say Jim was displeased would be the understatement of the century.  Let’s just say it was probably good that I was there with the inspector and not Jim so brawl was avoided.

Jim called the inspector.  After a “heated” conversation that did not end well, Jim called the inspector’s advisor.  The advisor was much more willing to work with us. In the end, he told Jim that if the company that makes the shower provided written confirmation about the mechanism to prevent water from getting too hot AND confirmation that a 2 inch drain is acceptable for that shower panel, then we would pass the inspection.  The company was happy to give us that confirmation and after a lot of unnecessary stress, we officially passed our inspection.  This made Jim especially please since the inspector had told him repeatedly over the phone, “I am not passing you.”

One thing that the advisor seemed to realize that the inspector did not, is that we are DIYers.  Every time we have applied for a permit, it has been because of self-reporting.  We are good, honest people who want to do right by the county and ensure the integrity of our home, so we want to follow the laws and get permits but there is nothing to stop us from not getting a permit.  The county would not know when and if we made improvements in our home and they are not about to start searching every home for DIYers who don’t get permits.  The county makes a profit every time we get a permit and if the county is going to make us jump through unnecessary hoops in order to pass inspections, we will stop getting permits and the county will stop making a profit. Luckily, it all worked out in the end, but I do think we need to request a different inspector for the next time.

Last night, we finished the last of the drywall.  It has been a week since we passed the inspection, but we got side tracked by another project (update to come on the blog).  The bathroom feels like a real room again!

The drywall in place in the ceiling

The drywall in place in the ceiling

Last wall up and in place!

Last wall up and in place!

The Monster in the Attic

Posted on

We have been busy with electricity this week.  Monday evening, Jim ventured into our attic so he could get a look at the wires currently in place in the bathroom.  The thing about our attic is that it is not an area meant for people to be moving around in.  There is no floor, so you have to walk from joist to joist so you don’t step through the 2nd floor ceiling. Also, when I say “walk” I really mean hunch over or crawl because the attic is not big enough for someone to stand in the space. The space gets smaller the closer to get to the front or the back of the house because the roof is slanted downwards to form a triangle. There are also nails coming out of the roof from the shingles being nailed on to it.  If that wasn’t bad enough, it is full of insulation that gets everywhere. Insulation is dangerous to breathe in, so Jim has to wear a face mask and goggles when going into the attic.  Oh and there are no lights up there, so it is pitch dark except where you shine the flashlight.

Knowing that we (that is a loose “we,” I have never been in the attic other than sticking my head up there to get a look and take a picture) needed to venture in the attic, Jim had the idea to bring some pieces of plywood up there to lay between joists. These sort of acted as a subfloor and allowed Jim a path to get from one side of the house to the other. Of course the master bathroom is all the way at the front of the house. So as Jim got closer to where he needed to be in the attic, the less space he had and he could no longer use the plywood to help him.

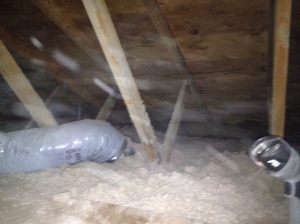
A picture of the attic - all the floating specks are put of the insulation

A picture of the attic – all the floating specks are put of the insulation

Trying to show how much the roof slants in and how little space Jim had to work

Trying to show how much the roof slants in and how little space Jim had to work

Our first course of action was to find the electrical box above the shower.  We planned to remove it and had two recessed lights above the shower instead. Since the electrical box was covered in insulation, I stood in the bathroom while Jim was in the attic and we were knocking on the ceiling to indicate where each other were.  After a little confusion and redirection, Jim found the electrical box.  At one point while he was moving around up there, I heard a noise and insulation began to fall down on me. I moved out of the way as part of the ceiling came hanging down. At this point, I started to fear Jim was going to fall through the ceiling and come crashing to the floor in front of me. We both came to the conclusion that maybe we should just cut out that part of the ceiling and then put new drywall up after the electrical was complete.

The ceiling hanging low after Jim was in the attic, it is a little hard to tell in the picture but if you look at both corners, you get a better idea of the slant

The ceiling hanging low after Jim was in the attic, it is a little hard to tell in the picture but if you look at both corners, you get a better idea of the slant

We still did not want to remove all of the ceiling though, so there were a few more things we had to do. Since we plan on installing an exhaust fan, we needed a spot to cut a hole in the ceiling for the fan. We needed to make sure there was a joist nearby so there’s somewhere to attach the exhaust fan. We had measured out about where we wanted the exhaust fan to go and put a nail into the ceiling. Jim had to try to find the nail below the insulation. This actually went by faster than the electrical box search. The nail happened to be pretty close to a joist, so we just moved it over slightly so it was up against the joist. Now we had the location of the fan planned out.  Our last step was to check out the wires near the light switch and electrical box above the sink. Since we are pushing the sink area back slightly, we also need to push back the ceiling in that area.  There was a two by 4 that was originally at the top of the previous wall that now would be in the way of the new ceiling and it had to be removed. Jim moved all the insulation out of the way so when we took it down, we wouldn’t be covered in insulation (he also tried to do this over the shower where we planned on removing the ceiling). I also needed to drill two holes up into the ceiling so that new wires could be put into place.  After this, we were thankfully done with the attic.

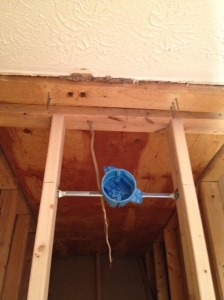
The new hole I drilled with the wire through it. You can also see the two by four in front of it with the old holes that we need to remove

The new hole I drilled with the wire through it. You can also see the two by four in front of it with the old holes that we need to remove

Jim back from the attic - he is covered insulation

Jim back from the attic – he is covered insulation

His back has it the worse

His back has it the worse

Striking a pose for the picture

Striking a pose for the picture

After Jim changed out of his covered-in-insulation clothing, he continued to do a few more things in the bathroom. It was getting late, so I went to go make dinner.  He took off the two by four we no longer needed, hooked up an outlet, and then decided to remove the part of the ceiling over the shower.  As I was about to get started on dinner, I hear Jim calling my name and saying he needed my help.  When I came upstairs, this is what I saw:

Even though Jim moved away as much insulation as he could when he was in the attic, so much of it can crumbling down when the ceiling was removed. Good thing Jim changed out of those dirty attic clothes...

Even though Jim moved away as much insulation as he could when he was in the attic, so much of it can crumbling down when the ceiling was removed. Good thing Jim changed out of those dirty attic clothes…

We both started to clean up all the insulation we could. It took longer than you may think. First we used our hands, then the broom, and finally the shop vac.   After all the cleaning, we called it a night.

Jim trying to get out any more insulation that may fall before we cleaned

Jim trying to get out any more insulation that may fall before we cleaned

The ceiling all gone above the shower

The ceiling all gone above the shower

The outlet Jim set up

The outlet Jim set up

He also connected the wire into the outlet box

He also connected the wire into the outlet box

The extra two by four all gone

The extra two by four all gone

Tuesday, we continued to work on electricity. We attached the last outlet box we will need (for the thermostat for the heated floors) and Jim put the housings for the recessed lights in place. I also cut out a spot for the exhaust fan to go.  I didn’t draw the exact square, just in estimate, so don’t judge my cutting job – it isn’t pretty.  Of course, when that part of the ceiling came down, so did a lot more insulation.  We only worked until about 7 because Jim had a volleyball game later that night.

Recessed light housing in place!

Recessed light housing in place!

Spot of the exhaust fan - I know it is not a square...it will be when the exhaust fan is going in though

Spot of the exhaust fan – I know it is not a square…it will be when the exhaust fan is going in though

All the electrical boxes in place and ready to go

All the electrical boxes in place and ready to go

Wednesday night called for another trip to the attic. Jim realized later on that there were some wires we still needed to run and/or move around.  There are a lot of wires that need to connect in a certain order. I think I have a pretty good grasp on it, but it isn’t worth trying to explain to you lovely readers (especially when I may explain something wrong). Jim went back up into the attic while I feed him specific wires from the bathroom.  It luckily did not take very long and Jim could come out of the attic quickly.  Jim got to work wiring the recessed lights housing while I did a few things to get the other wires ready for him. I stapled the wires already in place to the wall, pushed the wires through the electrical box, and striped the wires so they could be easily hooked up.  Once everything was in place for Jim, I stepped out of the way and let him do his thing.  About an hour and a half later, told me to turn on one of the circuits and come upstairs.  He had the recessed lights in place and working and all the electricity running to the right places. He did it perfectly. I was very impressed.  We called it a night at this point.

View of all the wires leading to one another

View of all the wires leading to one another

Light switches complete and working! Electricial box for the thermostat all wired up and ready to go!

Light switches complete and working! Electrical box for the thermostat all wired up and ready to go!

Light above the sink all ready to go

Light above the sink all ready to go

Wires ready for the exhaust fan!

Wires ready for the exhaust fan!

Working recessed lights!

Working recessed lights!

Thursday night, we did the last of the electrical work before Jim went to the station for the night.  Jim hooked up the exhaust fan and put it in to place (we have not set up the ducts for the fan yet, so we can’t turn it on to “vent” it, but electricity wise, it works great). While Jim worked on the fan, I did a few small things, such as attaching the wires for the heated floor to the thermostat and securing wires into place with nails.

Wires that will go to the floor for the thermostat in place

Wires that will go to the floor for the thermostat in place

Exhaust fan in place and wired up

Exhaust fan in place and wired up

Exhaust fan complete!

Exhaust fan complete!

We got to work almost immediately on Friday.  We were headed to NJ Saturday morning so we could go to a Jim Gaffigan show and we wanted to get the last of the plumbing done.  Jim scheduled the inspector to come on Monday to give us the ok on all our work, so all the work had to be done.  The last thing we had to do with plumbing had to do with the shower.  We bought a shower pane for our future shower. It has a rain shower head, a hand washer, and 6 body sprayers on it.  It attaches differently than a traditional shower head, so we had to set up the supply pipes to be able to attach to the new shower head. We bought a washer box for the supply lines to poke out of. The box ensures water proofing (an important factor in the shower).  We needed to move the supply lines closer together so they fit in the box.  This job should have taken us about 2 or 2 1/2 hours.  We started working at 6pm and thought it would be an easy job.  Of course, it did not work out that way.  The solder was acting funny when Jim was attaching the new pipes to the supply lines. It was not staying on the pipes and instead falling to the ground.  The solder was at the end of its roll so that may be why it was acting strange. Jim applied the flux paste with his fingers because we were out of brushes and the flux was burning making the pipes look black.  After a frustrating amount of time, the pipes appeared to be hooked up.  I went to go turn on the water supply and heard Jim screaming to turn it off.  Our first unsuccessful pipe soldering…I guess it was bound to happen.  We started all over.  We rethought a few things and changed our plan a little bit. We ended up working until 10:40 pm, not even taking a break for dinner.  Luckily, the second time was the charm and the pipes worked perfectly.

In the middle of our first attempt, supply lines are cut and read to be re-done

In the middle of our first attempt, supply lines are cut and read to be re-done

Completed second attempt - working perfectly now!

Completed second attempt – working perfectly now!