Oh, hello there, Internet. Nice to see you again. It has been over TWO YEARS since I last posted. I know, it is pathetic. To be fair, I have been a little busy for the last 22 months raising twins. In that time, Jim and I have also been slacking a little bit on home projects. But I am back, which can only mean one thing…a new project!
Before I get into the nitty-gritty of our new project (I’m using “our” loosely here, Jim is doing the work 100% solo while I watch the kids), I will tell you about the small projects we have completed over the past two years.
The Nursery
The first small project was the twins’ room. You may remember when we painted our bedroom, we had to add a header to our closet. The old closet doors went from the floor to ceiling and we would have to get custom-made closet doors for that size. Instead, we added a header and got normal closet doors. We ended up needing to do the same thing in the twins’ room (and we will need to do it again for the other three rooms on the second floor). Since I was pregnant and huge – Jim did all of the work on his own. After some of the other projects we have done, this was pretty simple. He needed to build the frame of the header, install it in place and then add the drywall. Once the drywall was in place, he needed to apply the spackle, wait for it to dry and sand it. Then the header was done! Jim also added molding for a more finished look but first, he painted the room.

A few pictures of the room before it became the nursery

View from the doorway
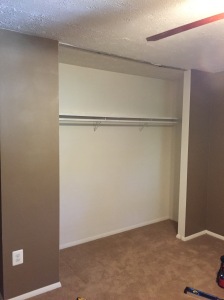
The closet before…
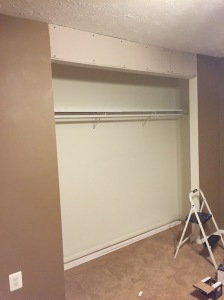
The header in place (without the spackle and paint)
I had picked out a gray and white nursery color scheme with touches of pink and blue. I had a very specific theme in my head. Jim and I went through our swatches and picked out a gray color for the room. Since we have painted so many rooms, we have a pretty good system down for dividing and conquering any paint job but since I was pregnant, Jim painted solo. He also closed the door to keep the fumes out of the house (so sweet). The problem with that is when he opened the door (and was 95% done), I saw the color and hated it. It was a shade of gray (I guess)…but it had a blue undertone to it. When I looked at it, it looked like a bluish gray. I almost cried. Actually, I think I did cry. This was my one crazy pregnant lady experience. It was not the gray I wanted and I wasn’t going to be happy until it was. Needless to say, Jim thought this was ridiculous and he was not pleased. Luckily, he indulged me and we found a REAL gray to paint over the blue-gray. It was so much better. The nursery could become what I had imagined.

The first paint job…see how it is a bluish gray?

Another view of the first paint job

Last one…look how blue it is in this!

The final paint job! A beautiful gray! (looks a little darker in this picture since it was taken at night)

The header all spackled and painted GRAY!
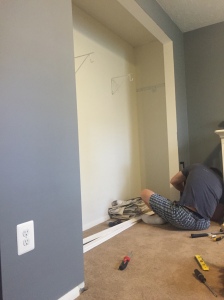
Jim working on the molding

Jim had to cut out some of the old molding to add the new molding around the closet

Closet completed (with pink and blue handles)!

Cribs all set up and in place – the letters to their names hang from the knobs glued above the cribs

Not the best picture with lighting, but another view with the glider and ottoman

View of the double glider, ottoman, and dresser
Closet completed (with pink and blue handles)!

We added a decal to the wall also!
Nursery Crafts
I did some little DIY crafts for the nursery as well. I got letters to spell out the twins’ names and painted them white with zig zag stripes (pink for Amelia’s and blue for Austin’s). I tied ribbon around the letters and we glued knobs to the wall to hang the letters by.
I also made some size dividers for the clothing in the closet. A little paint and glue and I ended up with these:
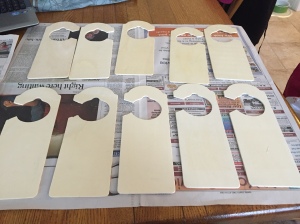
These were door knob signs so I had to cut them a little so they would fit like a hanger

All painted gray
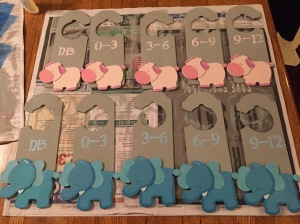
Finished!

Close-up View
I thought they were cute but after having infants, I would say they aren’t really necessary. You go through sizes relatively fast and I took out the small outfits as the babies grew. But still…cute.
Knobs and Levers
Another little project I did by myself involved the upstairs hallway bathroom. This is the one bathroom we haven’t redone yet and I hate it. It needs some serious updating. We aren’t ready to tackle another bathroom yet, so it is not on the immediate to-do list. One thing that was really bad about the bathroom was the shower knob. It is the kind that you have to pull out from the wall and then you twist it right or left to adjust the water temperature. It is the sweet old fashioned kind that looks like it is trying to be a crystal ball or something. Exhibit A:

I forgot to take a picture of the original knob…it was a worse version of this
The ugliness of the shower knob is not the problem (the rest of the bathroom isn’t cute either, so I just have to suck it up and deal until we…er Jim…wants to redo that bathroom). The problem was that it was incredibly hard to pull the knob from the wall to turn on the shower. This bathroom is our guest bathroom, so we often had guests try to turn on the shower for a while before calling for our help. Many were fearful they would pull the knob from the wall because they had to pull so hard. If we tightened the screw in the knob, it would get better but still not be good and would loosen again. I decided to replace the knob. I figured this was a job I could do on my own and surprise Jim with my DIY skills. I went to Home Depot and got two kinds of shower knobs; another crystal ball type one and one that was a lever. I took the old knob off and cleaned the area behind it. I saw that the piping had been pushed back a little which was contributing to the problem with the old knob. The piping must have shifted when we were redoing our master bathroom. The two bathrooms share a wall and all of the plumbing. I pulled the piping up a bit and put the new lever on but when I pulled the piping up, the tub faucet’s piping pulled up and caused it to poke out from the wall. I knew this was a problem, but I thought we could fix it with some silicon for waterproofing between the space and the wall. Once the new lever was on, I tested it by trying to turn on the water. No water came out of the faucet. The problem with the lever was that it could not be pulled out from the wall to turn on the water and it only twisted back and forth to control the temperature. Terrified I broke the shower, I quickly un-did the new lever and put on the new crystal ball knob I bought. Luckily, it worked! I was so relieved. It was a lot easier to use the knob and I figured the problem was solved!

After taking the old knob off, I realized I should take a picture!
Jim was somewhat impressed I fixed the knob situation but not so impressed that I caused the tub faucet to stick out from the wall. He was able to fix the problem by taking off the faucet and cutting back part of the piping and then reattaching the faucet. He then added silicon for waterproofing. A little bit more complicated than the just add silicon solution I had thought of, but luckily it was fixed!

New knob! Not super different than the old one in the looks department, but at least it works better now (also a whale cover over the faucet…not a permanent addition!)
Stair Banister:
As the twins became mobile, it was clear we needed to think about baby proofing. My biggest fear had to do with falls that would lead to serious injuries. This led me to the stairs. The stairs that lead to our second floor had an opening overlooking the living room without any banister. Even when we bought the house, we knew this was not the safest set-up. Being grown adults who know how to walk up and down stairs, fixing it was not our number one project. Now it was. Without a banister, there was also nothing to attach to a baby gate. This meant that not only could the twins try to go up the stairs on their own, they could also fall off the side opening of the stairs while attempting to crawl up the stairs. Jim had already installed a banister on the basement stairs when we redid the basement. It was a very similar procedure to add the banister to the first floor stairs. He had to undo some of what was already in place in order to make the banister work. He did an awesome job and we were able to install a baby gate at the bottom of the stairs! This baby gate is seriously a life saver keeping the twins on the (baby proofed) first floor.

Stairs before railing and banister (see the big opening at the bottom of the stairs)?

Unpainted railing in place!

Finished railing!

Finished banister!

Another view
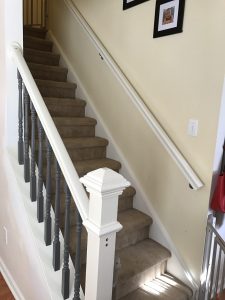
One more with more of the stairs
Basement Permit:
Another project we (uh, Jim) completed had to do with the basement. We had previously tried to close our permit for the work on the basement with one last inspection from the county. Unfortunately, we failed this inspection because we needed to install a GFCI outlet by the washer and dryer (that type of outlet automatically shuts off if exposed to water) and because we had to drywall under the stairs. The GFCI outlet was a simple fix that I did myself within a week of failing the inspection. Drywalling under the stairs was going to be time-consuming so it got put off…for a while. Drywalling can be annoying because of the need to cut all the pieces perfectly and then spackle and then sand the dried spackle and then sometimes need to repeat the spackling and sanding. Drywalling is even more annoying if it is for an area that is going to be used as a storage closet and it has an angled ceiling. After months and months of ignoring the open permit, Jim finally decided to get the drywall up and close the permit. He also decided to add some nice floor padding (we didn’t finish the floors under the stairs) and really spruce up the storage area. It was similar to any other drywalling effort though and we passed the inspection without issue. Permit closed. We still have a few more things we need to do to truly “finish” the laundry room, but that will come with time.

Drywall all completed for the closet under the stairs!

Trying to get a picture of the nice floor Jim put down (it was already covered by a bunch of things and I didn’t feel like cleaning it out…)
Ceiling Fans and Lights:
When we first moved into the house, we painted all the rooms on the second floor, added in new carpets, and updated two of the four ceiling fans. The two ceiling fans we replaced we really old and did not have lights on them. So we added modern ones with lights. The ceiling fan in our room was new with lights, so we left it alone. The reason we did not update the last ceiling fan was because it was not connected to the light switch and therefore it didn’t seem to make sense to add a ceiling fan with lights. It was also in a room we weren’t using as a main guest room, so we figured down the line we would come back to it. Well it is down the line.
On a side note – when the twins were 3 months old, the air conditioning broke. We discovered this during a random heat wave in April. Our whole A/C unit needed to be replaced. With better A/C, it was much more noticeable how poorly it worked on the second floor. In order to remedy this situation, it was suggested to add more insulation in our attic (which is basically just a crawl space). You may remember our attic is a nightmare to go up to from when Jim installed the ceiling fan and overhead lights in our master bathroom. Therefore, we decided before we put more insulation in the attic, we would do anything we could think of that might require Jim going into the attic. This encouraged us to install a new fan that was attached to the light switch in one room and also had a ceiling fan with lights to the room in the office. Outside of having to go up into the attic, these weren’t too complicated of projects. Jim had to cut some dry wall out-of-place by the light switches so he could connect the new wire to the light switch and feed it up through the ceiling. For the old fan, he ran the new wire to where the old fan’s wires were and hooked everything up. We have installed new fans before and if the wiring is in place, it is pretty easy-peasy. For the new fan, Jim also had to cut a hole in the ceiling and feed the wires in addition to installing the new fan. The fan in the office first made some burning smell and we decided to bring it back and exchange it for a new fan. With the exchange, the problem was fixed. Now every room on the second floor as a ceiling fan with lights that is controlled by a light switch!

Old fan in the extra bedroom

The new fan to replace the old fan (lights on)

Same fan with the lights off

No fan or overhead light in the office

New fan with lights in the office (lights on)!

Same fan – lights off
In addition to adding the fans in the ceiling, another ceiling project we wanted finished before adding the extra insulation in the attic involved the upstairs hallway bathroom. The only light fixture in that bathroom was above the sink. Whenever you took a shower in that bathroom and pulled the shower curtain closed, it got incredibly dark in the shower. We wanted to add ceiling lights above the bathroom so brighten up the room (especially for showers). Jim had to cut the holes in the ceiling as well as run the wiring from the existing light fixture to connect over the bathtub. In also had to install housing for the lights before hooking up the actually lights. The first lights he ordered ended up being way too bright, so he exchanged them for ones that were softer on the eyes. The lights are great and really help for bathtime with the twins and whenever someone showers in the bathroom! (It also helps me see all the imperfections of this bathroom better…we really need to get on redoing it…)

Holes in the ceiling with the wires coming out (Apparently I was really bad at taking before pictures during all of these renovations…)

The new lights over the bathtub (lights on)!

Same lights with them off (you can see we need to fix the drywall…but that is not a “priority” right now)
I *think* those are all the projects we have done in the past two years. There may be a post where I throw something else in I remember later on…but I doubt it. These were the pictures I had and all I can remember! Now on to that new project…


